The Battle of Jutland - May 1916
Russ Mallace advises: When reading this account please remember that this all happened BEFORE any form of RADAR or electronic navigation was invented. Indeed radio communications were in their infancy. Ships were communicating by telegraphy using Morse Code by this time but voice communications were still experimental. However obtaining a geographical bearing of the source of a radio signal was in use and was one of the methods the Royal Navy used to locate the German fleet in the battle of Jutland.

Above - initial course of the main protagonists before the battle
The Battle of Jutland, which took place over 24 hours commencing on the afternoon of Wednesday 31st May 1916, was the only major sea battle of the First World War and was the last ever fought between battleships.
The numbers involved were by any standards mind-boggling.
In the battle the British deployed 4 super Dreadnaught battleships, 24 Dreadnaught battleships and 9 battle-cruisers with 8 armoured-cruisers, 26 light cruisers and 79 destroyers.
The German fleet consisted of 16 Dreadnaught battleships, 6 pre-Dreadnaughts and 5 battle-cruisers plus 11 light cruisers and 61 destroyers.
Dreadnaughts had steam turbine engines and all big gun turrets, while pre-Dreadnaughts had triple expansion steam engines (“up & downers”). The 4 super Dreadnaughts had 15” (shell diameter) guns while the others had 11” guns. Battleships and battle-cruisers were similar in size but the battle-cruisers were more lightly armoured, so they were faster
The Royal Navy from the start of the war had been blockading the German coast and in 1916, Admiral Scheer was appointed commander of the German High Seas Fleet, with the intention of challenging the Royal Navy’s stranglehold.
With 16 Dreadnought-class battleships, compared with the Royal Navy's 28, the German High Seas Fleet stood little chance of winning a head-to-head clash. Scheer therefore adopted a divide-and-conquer strategy. To whittle away the British advantage they would stage raids into the North Sea and bombard the English coast, with the aim of luring out British squadrons, which could then be destroyed by superior German forces lying in wait, or by submarines (U-Boats).
Scheer’s plan in 1916 was to have a battle-cruiser section led by Vice Admiral Hipper sail into the North Sea as bait to lure out a part of the British fleet, with his main battle fleet following some 40 miles behind. When his battle-cruisers met British ships they were to turn and run, leading the British ships on to the guns of the main German fleet.
Unfortunately for the German plans, Room 40 at the Admiralty, the forerunners of Bletchley Park in WW2, were deciphering their messages and the British knew that the Germans were planning something big, although they did not exactly know what. So the British Admiral Jellicoe decided when the first German battle-cruisers left Wilhelmshaven he would position his ships 90 miles west of the mouth of the Skagerrak so as to intercept the Germans whether their intention was to go into the North Atlantic or east into the Baltic. In mid May, Scheer had also positioned U-boats to attack British ships leaving port but he had to delay Hipper’s departure due to maintenance work; when they did sail the U-boats were mostly out of position or out of fuel.
Britain’s Grand Fleet under Admiral Jellicoe sailed as soon as the Admiralty reported, from intercepted signals, that the battle-cruisers under Hipper had left port. Royal Navy ships from Cromarty Firth in the north east of Scotland joined up with Jellicoe’s fleet from Scapa Flow in the Orkney Islands while 6 battle-cruisers and 4 of the latest super-Dreadnought battleships under Admiral Beattie sailed from Rosyth near Edinburgh. Beattie’s task was to scout for the German ships and then turn north and rendezvous with Jellicoe.
However neither Jellicoe nor Beattie was aware that Scheer with the main German fleet had also left port. Scheer used the wireless identifier DK when ashore and a different one when afloat. Naval Intelligence knew that Scheer used a different call sign when afloat but the Director of Naval Intelligence, Rear-Admiral Thomas Jackson only asked Room 40 where DK was, and was told Wilhemshaven. So they advised Jellicoe and Beattie that the main German fleet was still in port.
Beattie’s instructions were to sail east for 250 miles and then turn north to the rendezvous point. His 4 battleships were on his northern flank so when the turn north was executed they were leading the fleet. At 1420 on the 31st May contact was made with Hipper’s fleet to the east, so Beattie ordered a turn to the southeast to cut them off from home.
Unfortunately due to poor weather conditions and the Royal Navy’s reliance on flag and lamp signals rather than wireless communication, the battleships were not aware of the turn until they had proceeded some 20 miles further to the North. Meanwhile Hipper had turned his ships round to lead them towards Scheer. In what became known as “the run to the south” Hipper’s gunners proved to be far more accurate than the British.
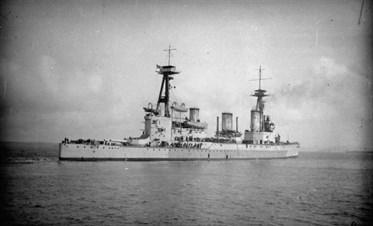
First HMS Indefatigable (ship's named in bold black font are shown in embedded images) was hit in a turret and the shell entered the magazine below. The ship exploded; there were only 2 survivors.

20 minutes later HMS Queen Mary was hit in a similar manner, exploding, leaving only 20 survivors.
In all, German shells struck Beattie’s ships forty two times while the British only managed seven hits on the Germans.
It may seem obvious from this that British capital ships were not designed to take hits on their turret tops; German vessels seemed to be better protected. Sadly we do not learn from history, as almost exactly twenty five years later, the Royal Navy's "mighty Hood", the last battle cruiser built after the first world war, succumbed to the first salvo from KMS Bismark; shells penetrated her lightly armoured topsides and her magazine exploded - there were three survivors!
Beattie’s battleships were now catching up but Hipper was heading south leading them towards Scheer. Suddenly Beattie saw the totally unexpected appearance of the entire German fleet. He turned round his ships but due once again to poor signalling the battleships were not aware of the manoeuvre and found themselves passing the battle-cruisers in opposite directions. They were then ordered to turn “in succession” rather than “simultaneously” meaning the rear ships were still sailing towards the Germans while the one in front turned. The captain of the trailing ship, HMS Malaya, ignored this order and did not wait to turn!
So began the “run to the North”. The battleships were now carrying out a rear-guard action as Beattie led the Germans towards the advancing fleet of Jellicoe. Their gunnery was better than the battle-cruisers and while hit themselves they scored 13 hits on the pursuing Germans.
Hipper in SMS* Lutzow had now joined with Scheer as they followed Beattie north unaware that the British fleet was waiting for them.
Jellicoe, in order to deploy his ships for battle, needed more information on the German whereabouts but received little from Beattie, so he sent out scouting missions, including a battle cruiser squadron under Rear Admiral Hood in HMS Invincible. They encountered Hipper’s flagship SMS Lützow and so damaged her that she eventually sank but not before she hit HMS Invincible in a gun turret, exploding the magazine and the ship, taking with her Admiral Hood; there were only 6 survivors. After SNS Lützow sank Hipper transferred to a torpedo boat, SMS G39.
In the hectic deployment for battle the armoured cruisers HMS Defence
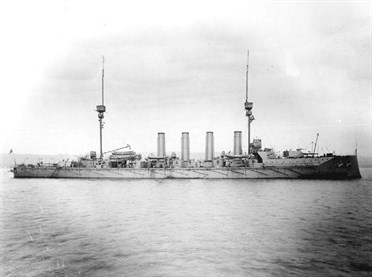
and HMS Warrior, inadvertently found themselves close to the Germans and came under heavy fire. HMS Defence was hit in the magazine and exploded sinking with all hands (903) and HMS Warrior was so badly hit that she was abandoned the next day and sank.
By 18:30, the main battle fleet action was joined for the first time, with Jellicoe effectively "crossing Scheer's T". This meant that all of Jellicoe’s ships could fire all their guns at the advancing German column while they would only be able to use their forward guns. Scheer was taken completely by surprise emerging from drifting clouds of mist and smoke to suddenly find themselves facing the massed firepower of the entire British Grand Fleet’s main battle line, which he was not aware was even at sea. Jellicoe's flagship HMS Iron Duke quickly scored seven hits on the lead German dreadnought, SMS König but in this brief exchange, which lasted only minutes, as few as 10 of the Grand Fleet's 24 Dreadnoughts actually opened fire. Realising he was heading into a death trap, Scheer ordered his fleet to turn and flee. Under a pall of smoke and mist, Scheer's forces succeeded in disengaging by an expertly executed 180° turn in unison.
Conscious of the risks to his capital ships posed by torpedoes, Jellicoe did not chase directly but headed south, determined to keep the German Fleet west of him. Battleships at the rear of Jellicoe's line were in fact sighting and avoiding torpedoes. Meanwhile, Scheer, knowing that it was not yet dark enough to escape and that his fleet would suffer terribly in a stern chase, doubled back to the east at 18:55. In his memoirs he wrote, "the manoeuvre would be bound to surprise the enemy and upset his plans for the rest of the day, and could facilitate the breaking loose at night." But the turn to the east took his ships, again, directly towards Jellicoe's fully deployed battle line.
By 19:15, Jellicoe had crossed Scheer's "T" again. This time the arc of fire was tighter and deadlier, causing severe damage to the German battleships, particularly the leading 3rd Squadron with SMS König, Grosser Kurfürst, Markgraf, and Kaiser all being hit, along with SMS Helgoland of the 1st Squadron; on the British side, only the battleship HMS Colossus was hit but with little damage done.
At 19:17, for the second time in less than an hour, Scheer turned his outnumbered and out-gunned fleet to the west using the "turn in unison” manoeuvre again but this time it was executed with difficulty as the German High Seas Fleet's lead squadrons began to lose formation under concentrated gunfire. To deter a British chase, Scheer ordered a major torpedo attack by his destroyers and a potentially sacrificial charge by Hipper’s four remaining battle cruisers. Hipper was still aboard the torpedo boat SMS G39...

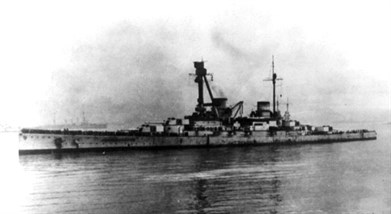
and was unable to command his squadron for this attack. SMS Derfflinger, under Captain Hartog, led the already badly damaged German battle-cruisers directly into "the greatest concentration of naval gunfire any fleet commander had ever faced", at ranges down to 4 miles.
In what became known as the "death ride", all the battle-cruisers except SMS Moltke were hit and further damaged, as 18 of the British battleships fired at them simultaneously. SMS Derfflinger had two main gun turrets destroyed. The crews suffered heavy casualties, but survived the pounding and veered away with the other battle-cruisers once Scheer was out of trouble and the German destroyers were moving in to attack. In this brief but intense portion of the engagement, from about 19:05 to about 19:30, the Germans sustained a total of 37 heavy hits while inflicting only two; SMS Derfflinger alone received 14.
While his battle-cruisers drew the fire of the British fleet, Scheer slipped away, laying smoke screens. Meanwhile, from about 19:16 to about 19:40, the British battleships were also engaging Scheer's torpedo boats, which executed several waves of torpedo attacks to cover his withdrawal. Jellicoe's ships turned away from the attacks and successfully evaded all 31 of the torpedoes launched at them though, in several cases, only just barely – and sank the German destroyer SMS S35. British light forces also sank torpedo boat SMS V48, which had previously been disabled by HMS Shark. This action, and the turn away, cost the British critical time and range in the last hour of daylight – as Scheer intended, allowing him to get his heavy ships out of immediate danger.
The last major exchanges between capital ships in this battle took place just after sunset, from about 20:19 to about 20:35, as the surviving British battle-cruisers caught up with their German counterparts. The British received one heavy hit on HMS Princess Royal but scored five more on SMS Seydlitz and three on other German ships.
Jellicoe did not want a night encounter so decided to continue south and wait until dawn.
Scheer however turned north and crossed the wake of the British fleet to pass to the east of Jellicoe.
Jellicoe and his commanders did not understand that the furious gunfire and explosions to the north (seen and heard for hours by all the British battleships) indicated that the German heavy ships were breaking through the screen astern of the British fleet. Instead, it was believed that the fighting was the result of night attacks by German destroyers. The most powerful British ships of all (the 15-inch-gunned 5th Battle Squadron) directly observed German battleships crossing astern of them in action with British light forces, at ranges of 3 miles or less, and gunners on HMS Malaya made ready to fire, but her captain declined, deferring to the authority of Rear-Admiral Evan-Thomas – and neither commander reported the sightings to Jellicoe, assuming that he could see for himself and that revealing the fleet's position by radio signals or gunfire was unwise, as they were ill-prepared for night fighting.
In the first of many surprise encounters by darkened ships at point-blank range, HMS Southampton, Commodore Goodenough's flagship, which had scouted so proficiently, was heavily damaged in action with a German Scouting Group composed of light cruisers, but managed to torpedo SMS Frauenlob, which went down at 22:23 with all hands (320 officers and men).
From 23:20 to approximately 02:15, several British destroyer flotillas launched torpedo attacks on the German battle fleet in a series of violent and chaotic engagements at extremely short range (often under 0.5 miles). At the cost of five destroyers sunk and some others damaged, they managed to torpedo the light cruiser SMS Rostock, which sank several hours later, and the pre-dreadnought SMS Pommern, which blew up and sank with all hands (839 officers and men). Three of the British destroyers collided in the chaos. The German cruiser, SMS Elbing, was accidentally rammed by the Dreadnought SMS Posen and abandoned, sinking early the next day.
Just after midnight on 1 June, SMS Thüringen and other German battleships sank HMS Black Prince of the ill-fated 1st Cruiser Squadron, which had blundered into the German battle line. Deployed as part of a screening force several miles ahead of the main force of the Grand Fleet, HMS Black Prince had lost contact in the darkness and took a position near what she thought was the British line. The Germans soon identified the new addition to its line and opened fire. Overwhelmed by point-blank gunfire, HMS Black Prince blew up, (857 officers and men – all hands – were lost).

Finally, at 05:20, Scheer's fleet had escaped and was safely on its way home.
The British Grand Fleet lost 6,704 men, 3 battle cruisers, 3 armoured cruisers and 6 destroyers.
The German High Seas Fleet lost 3,039 men, 1 battle cruiser, 1 pre-dreadnaught, 4 light cruisers and 5 destroyers.
When reports reached home of the British losses the press was extremely scathing in what they considered to be a major defeat for the Royal Navy. But although the British fleet suffered more losses than the Germans it was eventually considered a victory, as the Germans made no further attempts to enter the North Sea. After the battle they moved on to all out submarine warfare.
*SMS = Seiner Majestät Schiff (His Majesty's Ship) of the German Kaiserliche Marine
Russ Mallace, May 2016.
For those who wish to absorb further information about this battle, we refer you to Admiral Sir John Jellicoe's Grandson Nic's video and annimation via www.jutland1916.com
Elsewhere amongst these pages, you will find Dougie's story, provided by his son Patrick. Patrick, who lives and works in Hong Kong, reminds us that Hong Kong's noonday gun was actually used as a weapon of war in the Battle of Jutland.